

Are you interested in using Android and thinking of buying a new phone to try this out? Don’t think twice, your Windows Mobile phone could have the capability of using or running Android already. Check the steps below to learn how and what type of phone you need to run Android.
- Prepare a MicroSD Card – In order to run Android, you have to have a MicroSD card, which is not SDHC, meaning not less than 2GB. You also need to have a supported Windows Mobile phone at the same time. Check the compatibility of the SD card through its label, indicating “HC”. Format the MicroSD card into FAT32, and then plug it into the computer. After which, right click on it and then choose the format. Remember that formatting an SD card requires you to delete everything on that drive. Thus, ensure that you have all the important files saved or backed up before doing so.
- Install Android – Once the MicroSD had been formatted, you can now start installing Android. The very first step is to find the very right Android port for your phone. Find the port, which will work on your phone, including the Android, which you want to run. Android versions typically start with 1.0, while usual ports will look for 1.6 or 2.1 versions. After finding the right port, extract the filed into a folder using the “7-zip”.
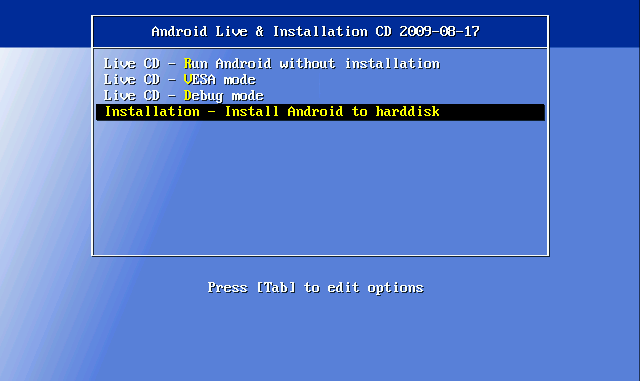
- andboot – After extracting the files, you will notice a folder labeled “andboot”. Go to that folder, and there you will another “startup config” folder or just “startup”. Just open this folder, and from there you have to find the right startup.txt file. In every folder, you will find a single file of “startup.txt”. Copy this file to your phone model towards the root of the “andboot” folder. This entire file will inform Android of what hardware type you have, how big the screen is, the phone’s RAM, and so on. Hence, it is very crucial that you choose the right file. Look for the specific phone names to avoid confusion. After all this, you can now copy the whole of andboot folder to the root of the newly formatted SD card.
- Plug back the MicroSD – Plug your phone to avoid hanging, and then plus back the microSD card in your phone. Open the file browser, and then browse the memory card. Open the andboot folder and then run haret.exe. From here, you must see some scrolling text and an Android logo, while booting the phone for the first time. Keep in mind that this process may take a considerable time.
- Linux Settings – Once the basic Linux settings are done, your phone will boot into a welcome screen, allowing you to explore the rest of the settings. It is highly recommended that you let your phone stand for a couple of minutes, allowing it to sync information. After the initial syncing, your “Android” phone will run faster, and do app installations and so on.
Important Tip
You can change any settings or install apps that you want. These will be saved to the memory card, and will be ready for the subsequent boot. A phone that runs Android through the MicroSD card will boot Windows Mobile automatically, whenever the phone restarts. Simply open the file browser, and then run haret.exe to run Android again.
![]()