

Lollipop is likely my favorite OS to come out this year. Well, out of the big two to release. It’s smooth, quick, Material Design is one of the most visually impressive aspects of a smartphone I’ve seen in forever, and if you’re running it on a Nexus or other equally powerful phone, you simply won’t find anything that can touch it.
Now, don’t let that worry you if you have a device that is eligible for Lollipop but isn’t one of the vaunted Nexus series. It will still most definitely run it. But keep in mind that the Nexus line, well the new ones at least, were designed for Lollipop.
That said, let’s take a look at a breakdown as to how you can, if you a rocking a Nexus 6 or 9, pick up Lollipop for yourself, along with a few features that the operating system may have that you might not really expect.

First and foremost, you can’t play with Lollipop unless you have it. Unfortunately, it’s currently not as easy as updating your phone through the Settings like it used to be. Google has not released Android Lollipop as a complete and easy OTA update. It will require a little bit of know-how when it comes to the inner workings of your phone, but I’m here to walk you through the process to get you rolling. It’s not a hard process, but for those unfamiliar with how to flash a phone, I would advise that you simply wait for Lollipop to release as a required update for your phone that only takes a few taps of the finger. As always, be aware that mobiletweaks.net is not responsible if you brick your new Nexus. If you’re uncomfortable, just wait.
One last thing. You will require a Nexus device that has an unlocked bootloader. That process can be found here if you are unsure as of how to do that. Again, as stated above, keep in mind the risks of doing this sort of thing to your device. Often you can end up with a voided warranty at best and a paperweight at worst.
So, that said, let’s get started.
OTA options do exist, but they’re not what you think. In the end, you’re basically going through a similar process. This process here will require to you download an image from Google, which is the factory image they’ve released ahead of the mass release of Lollipop itself.
Go into your computer and find your Android SDK folder that comes after installing Android SDK on either your Windows machine or Mac. After downloading the image from Google, you will need to find it on your computer, and hopefully you have a designated downloads folder for organizational purposes. Once found, unpack the image into the folder I just had you make on your computer, usually through an extraction means such as Winzip or Winrar, though I recommend 7Zip.
On your Nexus, going into your Settings menu, then Development. Under Debugging, enable USB debugging. This allows you to transfer the image to your phone from your computer, which you will do shortly. Debugging is a common requirement for nearly any level of flashing or rooting on a smartphone, so remembering this simple step is a good thing to do if you have interest in rooting.
Once that is done, shut your device completely off, then plug it in with it powered down, but don’t plug the other end of the USB cable into your computer just yet. Before you go any further, I need to make sure you realize that this is not simply an OS update. You are flashing your device, which basically means that you are wiping your device completely and reinstalling Lollipop back in place overtop of anything, OS and saved data included, that existed on it. Once it’s done, you will not be able to retrieve your files if you did not back them up elsewhere to begin with.
Now, you’re going to get the unlocked bootloader, the one mentioned above, up and going instead of just powering the phone on like usual. To get the bootloader going, hold down Volume Up, Volume Down, and THEN power on your device. You will see a menu with small text on it with the Android alien above it.
Once the menu has loaded, plug the cable into your computer.
Now, on your computer, open up your Terminal window or Command prompt, depending on which you use.
Remember where you put your Android SDK/platform-tools folder? The place where you unpacked the Lollipop image? Point Command Prompt or your terminal window to that folder and get it open.
From here, it’s pretty simple.
IF you are using Windows, simply type this command: flash-all.bat
For Mac, use this: ./flash-all.sh
The command for Linux users, if you happen to be on a Linux machine, is the same as for Mac. However, I suspect if you can run and set up Linux, this guide will be a bit redundant for you. If not, then I’m glad to help!
Once this command is entered, you will see that your device will begin to wipe itself clean. Once again, at this point, your files are pretty much history, so be sure to have anything you want backed up elsewhere. And please, do NOT unplug your phone until it is completely done, as in it has rebooted itself all the way to the Android Homescreen on Lollipop. While it is recoverable if this unfortunately happens, there is inherent risk is this process just like there is if you decide to do this flashing at all.
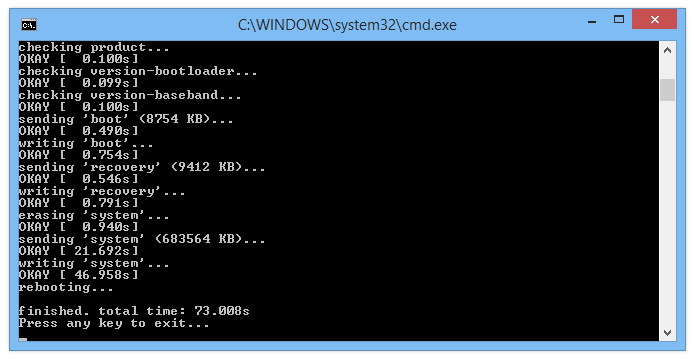
Once the wipe is finished, you will see that Android 5.0 Lollipop will be installed on your Nexus, well ahead of the OTA updates that will be rolling soon, at least as more and more of the Nexus devices find their way into consumer hands.
Basically, you’re done! Let Android finish installing and that is, honestly, all it takes. Again, it’s not a difficult process, but to some unused to working behind the scenes in their devices, it can be a bit intimidating. If you’re set on doing this, simple follow our instructions and you’ll be fine!
![]()